Monday, August 27, 2012

Tutorial of the Day

Greetings D.I.Yers

Ever wanted to buy a tailor ham for your sewing projects, had it on your to get list, but never did. Maybe because the prices where to high especially depending where  your located and you keep hoping the darn prices would go down. Well have no fear TUTORIAL is here!!!!!.

Ok so i was doing my daily researching on the web and I came across this wonderful tutorial on how to make your own tailor's ham. For those that know what a tailor ham is used far will find this tutorial very useful and those of you that don't.

A Tailor's Ham  or dressmaker's ham is a tightly stuffed pillow used as a curved mold when pressing curved areas of clothing, such as darts, sleeves, cuffs, collars, or waistlines. Pressing on a curved form allows a garment better to fit body contours. To accommodate tapering or garments of different sizes, it has roughly the shape of a ham.

 So thanks to  Sai Wongcongsawat, from chance of rain for this awesome tutorial and check out the link below to check out more of there crazy tutorials. Hope your fuljoy this tutorial brought to you by menen-idiyer.blogspot.com and continue to check me and send me a pic of your tailor's ham. Keep fellowing D.I.Yers and leave your thoughts or comments. 

Peace and Blessed
Luv Heart

http://www.chance-of-rain.com/2011/diypt-series-no-1-tailors-ham-free-pattern/

DIYPT Series: No.1 Tailor’s Ham (Free Pattern)

Hello and welcome to the first tutorial of my “DIY Pressing Tools” Tutorial Series.
Those of you who sew regularly know how important it is to have the right pressing tools. And those of you novices, will learn the importance of having one (I know I sound like a granny right now, bare with me, I am getting somewhere).
Tailor’s Ham (or Dressmaker’s Ham) is one of those tools all seamstress should have at hand and as The Vogue Sewing Book would say, it is not substitutable. You see, the little tailor’s ham is supposed to simulate our actual body’s curve. A faithful ham will make you say goodbye to those eyesore wonky curve seams. Tailor’s ham will help you create a more professional and good looking garment.
However (ha!) an enthusiastic but low budget seamstress may feel that paying for a lump of sawdust stuffed cushion is a bit of a rip (yes you guess who!). I mean one of Dritz ham will set you off at US$9.55 but I mean you can make a dress with that (scrooge mcSai iis here)! And isn’t there something rewarding about making your own? You can choose whatever colour ham you want to have. That is why, my dear readers, I would like to share with you a few easy steps to make your very own personalised tailor’s ham!

What Size is your Ham?

Hams come in many different sizes and shapes(!!), to suit different types of garments and purposes of course. In this tutorial I will show you how to make the simplest, most commonly used by home sewist (just like those Dritz Pressing Hams). But don’t worry I’ll give you patterns for a couple of different size/shape hams, should you be interested in making more. See bottom of the post for free pattern download.

Things you’ll NEED:

  1.  6″ x 9″  Tailor’s Hams  pattern
  2. 10″x8″ Firmly Woven or 100% Cotton fabric
  3. 10″x8″ Wool Fabric
  4. 25″x10″Plain 100% Cotton (like the unbleached muslin)
  5. Sawdust for stuffing
  6. A dowel or something to help you stuff the sawdust

fig. a
Cut out the pattern pieces as per fig.a;  1 x Contrasting Cotton, 1 x Wool and 3 x Plain Cotton

fig. b
Baste constrasting cotton & 2 piece of plain cotton together. Baste wool fabric & 1 pieces plain cotton toghether. Baste all the way around the pieces.
fig.3
With right sides of fabric together (contrasting cotton & wool facing each other) stitch, using 1/2″ seam allowance and 2-2.5mm stitch length, the two sets of fabric together. Leave  about 3″ gap at the widest end for turning out and stuffing.
Notch the corners to make sure your ham will turn out with smooth curve but only do it at the curviest point so that you don’t end up weakening the seam of the ham. Turn the ham shell right side out.
Now lets get on with the stuffing. I initially wanted to use fine sawdust (just to make sure there is no lump and bump on my ham), but with no avail I couldn’t get hold of any. I went to a couple of local carpenter and wood workshops and they told me that in these days and ages they are not allowed to sell it anymore (due to health and safety reasons). I dragged Sirio with me (you see his Spanish is native and mine is umm bad), and we weren’t very convinced about the prohibition on selling sawdust, I know the health and safety makes sense, but anyway…
 
In the end I went to a supermarket and got a pack of (1.5L worth) fluffy sawdust (untreated soft wood shavings), which costs me about €1.80. You know, the one they use for hamsters, rabbits and cute tiny animals. With this amount I should be able to make a 6¨x9¨ tailor´s ham and a 3¨x 15¨ seam roll. It will have to do. I think the stuff is soft and just about fine enough to create a smooth ham. It has to be better than scrap fabric, which dare I say, will make my ham lumpy.
fig.5
Before you begin stuffing the ham, find a place where you can vacuum easily as it get quite messy. Use a funnel or a spoon. You can make a funnel from a piece of cardboard. Start filling the ham till you reach the half way point. Press and compact the sawdust into the seam as much as you can. The ham will be a little wonky at first but keep pushing. Use a dowel or a stick. I use chopstick to keep pushing the sawdust into the corner seams. Tried to smoothen it out at the same time and then keep filling to the top. Make sure you fill the sawdust as much as you possibly can to make sure your ham is firm.
fig.6
Once filled, press the overflowing sawdust in with a dowel or spoon or your hand and pin the opening. Hand fell stitch to finish, using embroidery floss for extra strength.
Clean your ham using vacuum cleaner and voila! You are done!
Thanks for reading my tutorial, I hope it is helpful and if you have any questions don’t hesitate to ask :)
Enjoy your ham!

Friday, August 24, 2012

REVAMP FRIDAYS !!!!

What's up D.I.Yer is Revamp Fridays Again!!

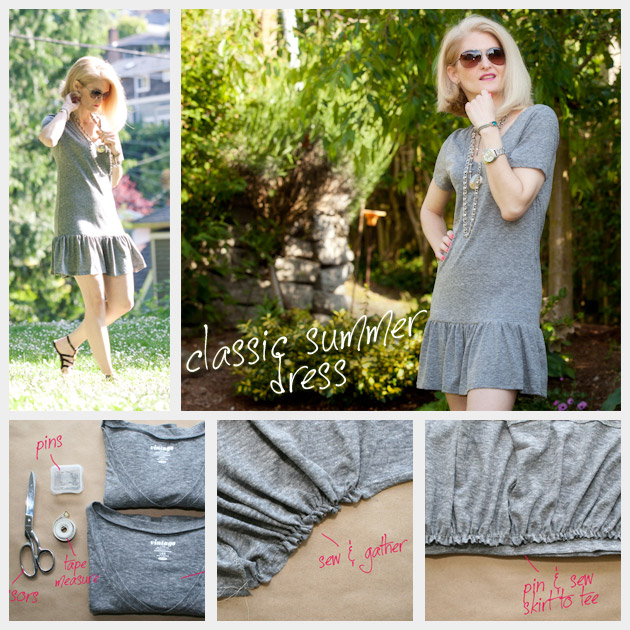
And you know me I got a crazy must try revamp tutorial for you guys to try. Ever had a big ass t-shirt and you don't want to get rid of it but you don't know what to do with it.  Will why not revamp it, for god sakes it revamp Fridays. So check out this cool D.I.Y T-shirt to Dress from trinkets in bloom. Be sure you check out the link for more of their must try tutorials. Keep the link stink and leave a comment or thoughts and tell me how your t-shirt to dress turn out.  Until next time D.I.Yers. 

Peace and Blessed 

LuvHeart


http://www.trinketsinbloom.com/wearable-diy/t-shirt-dress-diy/

T SHIRT DRESS DIY

This simple DIY tutorial will show you how to turn a basic t shirt into a cute Summer dress.T Shirt Dress DIY
VIEW DETAILED INSTRUCTIONS >
To see step by step instructions and photos click here.

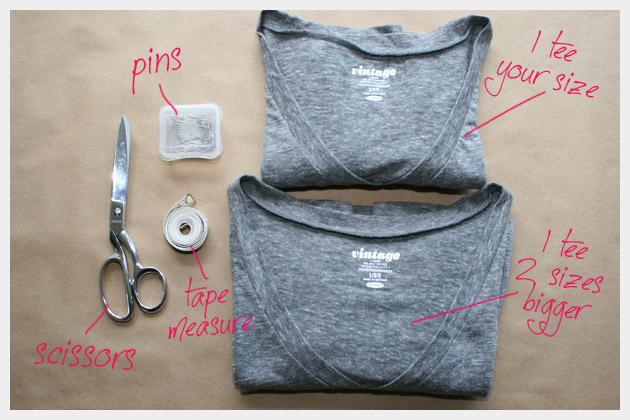
What you’ll need to make your T Shirt Dress DIY:

  1. 1 T Shirt in your size (try to find one that’s a little long, I found mine at Old Navy)
  2. 1 T Shirt at least 2 sizes larger
  3. Scissors
  4. Tape measure
  5. Pins
  6. Sewing machine
Supplies For Your T Shirt Dress DIY
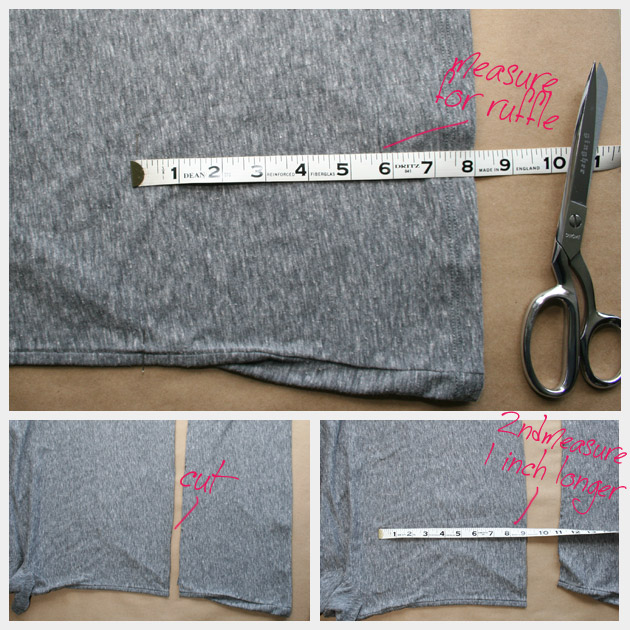
Step 1
Take your larger T shirt and lay it flat on a table, measure how long you want your skirt to be, mark it and cut your shirt straight across.
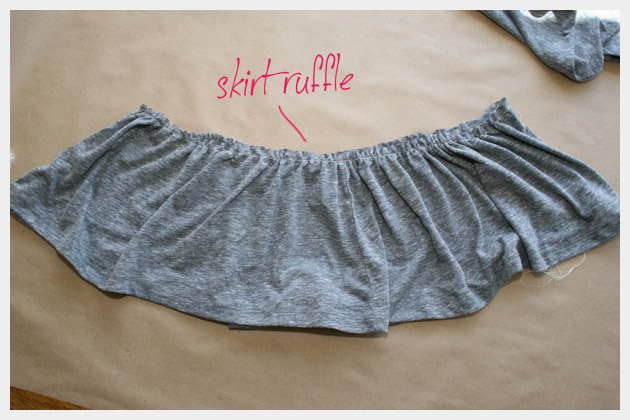
Since the T shirt that I used for the body of my dress was a bit long I only needed to make my skirt 9 inches and I was able to cut a 2nd strip the same length to add more gathers to the skirt.How to Make A T Shirt Dress
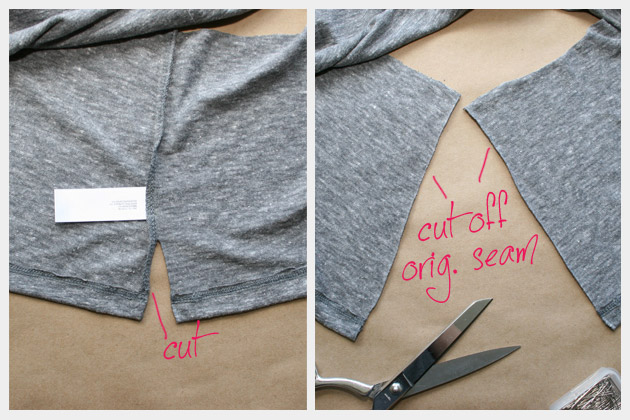
Step 2
Cut open the side seams on both strips that you will be using for your skirt.DIY Tutorial for T Shirt Dress
Step 3
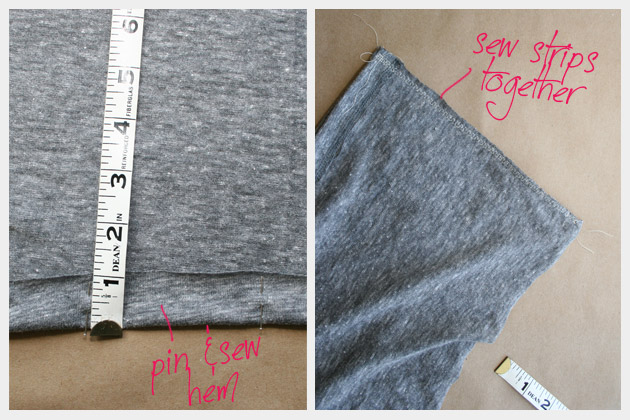
Pin and sew a hem in your 2nd strip of fabric that you will be using for your skirt, use the existing hem for as much of your skirt as you can.
Sew your strips together.DIY Fashion T Shirt Dress
Step 4
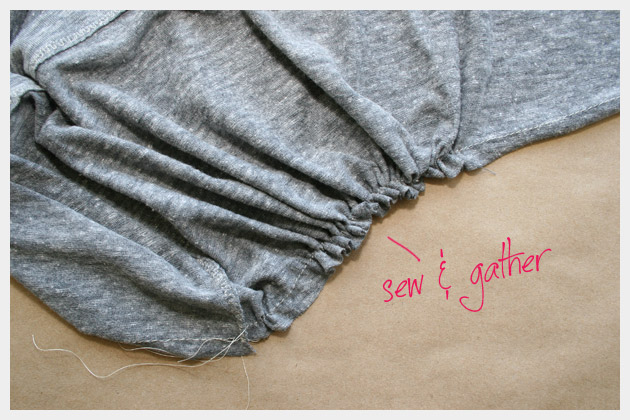
Sew 2 parallel stitch lines along the cut edge of your skirt. Use a big stitch so they will be easy to gather.
Pull the bobbin threads and gather your skirt.T Shirt Dress TutorialT Shirt Dress How to
Step 5
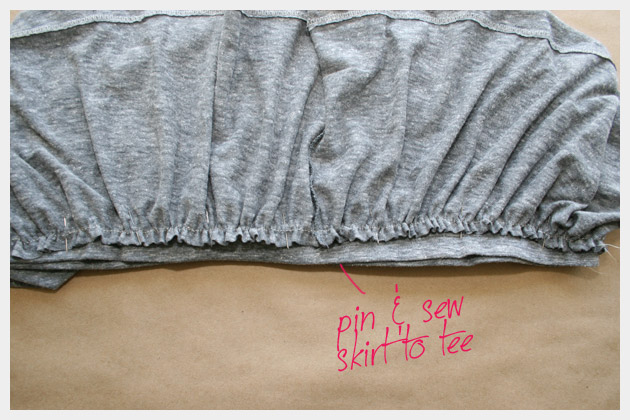
Lay out your top T shirt flat on a table and place your skirt (inside out and upside down) on top. Very carefully adjust your gathers so they are even all the way around and pin.
Sew your skirt to your T shirt. I recommend using a stretch stitch on your machine if you have one, otherwise use a very small stitch.T Shirt Dress DIY TutorialT Shirt Dress Fashion DIY Tutorial
As the weather heats up it’s so nice to just throw on a comfortable dress, some cute shoes, your favorite jewelry and you’re out the door. One of the best things about wearing a dress is how effortlessly they can make you look pulled together, even on a hot day. This is such a simple DIY project, but you still have a lot of room to get creative.

Friday, August 17, 2012

Revamp Fridays

Happy Friday!!! My D.I.Yers

Have you every had a favorite shirt that you just don't want to get rid of, and maybe because of  the excessive amount of times you wore the shirt, you developed little wear and tears on the sleeves. Well I bring you good news, now you don't have to get rid of the shirt, REVAMP IT!. And thanks to Disney from Ruffles and Stuff for showing us this cool, amazine way  to to spice up that favorite t-shirt. So Be sure to check out out her blog , and keep it locked for more D.I.Y tutorials. http://www.rufflesandstuff.com/2010/03/ruffly-shirt-refashion.html.  


Peace and Blessed

Luv  Heart


Ruffly Shirt Refashion


This shirt was a little $5 Target special that my husband got at Christmas time. I was planning to add some rosettes or something. I love the coral color! (which looks orange, because my camera can't handle coral.)


1: To make it, you'll need to take a long-sleved shirt, and cut the sleeves off so they are a nice short-sleeve length:

2: Then cut each sleeve into two 4" strips, and trim another 1" section off of each, leaving 4 3" strips.


3: Sew one end of two of the 3" strips to the end of the other two, to make 2 very long 3" strips. (do the same for 2 of the 1" strips)

4:Gather both the 3" strips into ruffles that are the length of the front of your shirt.


5: Lay the ruffles on the front of your shirt, with gathered edges ouching, then lay your 1" strip over the gathers, and pin well.

6: Sew the 1" strip and ruffles on to your shirt with a zig-zag stitch.

7: Then arrange buttons down the front, and tape them into place with clear tape. Sew them to your shirt well with a zig-zag stitch.
(You'll need to adjust the stitch width, and use the hand wheel to make sure that the needle will go into each hole without hitting the button.)


Then hem up your sleeves with a zig-zag stitch, and you're done!


Possibly the worst photo ever taken of me;
I'm not 5 months pregnant, I just have bad posture, and it was potluck Sunday, you know what I mean?


And this one is blurry, but at least I'm not pregnant! I really failed in the photo-taking department today! Sorry! :o)


And thanks for all the feedback about the layered skirt! I'll be starting it soon, and I'll try to do a t-shirt waist band version as well! You were so right on about the springy floral fabric, I'm dying to make one like that! Yay, spring!!

Take care!!

Thursday, August 16, 2012

Tutorial # 2 - D.I.Y Thursdays

Hi Guys I told  you its D.I.Y Thursday, so here's you second must try D.I.Y tutorial for you, my D.I.Yers.  Thanks to our friend Ros at Sew Delicious I am sharing with you their great D.I.Y Clothing Labels Tutorial. Check them out and the other great tutorial on the link below. Don't forget to send me your D.I.Y pics and lets reason, Happy D.I.Y Thursday D.I.Yers !!

http://sewddelicious.blogspot.com/2012/01/diy-clothing-labels-tutorial.html

Peace and Blessed 

Luv  Heart

DIY Clothing Labels - Tutorial


Labels can be quite expensive, so I thought today I would share how I make mine. There are lots of fantastic tutorials out there by other crafty people, but mine is a little bit different - I am going to show you how to design a logo to use on your labels as well. This is not only great for people wanting to add a professional touch to their sewing projects, but also for parents who need to put name labels in their children's school and sports clothes and uniforms.

Pin It


Supplies:
Computer and Printer
T-Shirt Transfer Paper
Ribbon (I use 1cm wide polyester grosgrain or cotton twill)
Scissors
Iron and ironing board
Cigarette lighter (to melt ribbon edges so they don't fray)


To create the logo on my label, I used Picnik. I know they are closing their website in April, but you will still be able to use it, they are moving all their services over to Google+.

*Edit - Picnik is now closed. Another great site for photo and image editing is
PicMonkey.

First, upload an image to Picnik. Unfortunately you cannot start with a blank image. Go to 'Stickers' on the tool bar, then choose 'Geometric'. Cover your entire image with a rectangle and change it to the colour you desire.


Next, go to 'Text' and type in the text you would like on your label. Play around with fonts and colours until you are happy.


Add a little logo if you would like to - the bird I use is available in 'Stickers' along with many other lovely little pictures.

Next, use 'Basic Edits' and crop your picture into a rectangular label shape.


You are done - click 'Save and Share' and save it somewhere easily accessible.

Next - open a word processing document (mine is MS Word) and create a table. Mine has three columns and is the length of an A4 page. Insert your label image into the first cell and resize it to your liking. Copy it, highlight the whole table, and paste it. You will now have this:


Now time for printing.
Important - do a practice run with some plain paper before using your tshirt transfer paper, it is too expensive to waste! You will notice that my logos are not mirror images - most computers will do that automatically. Your practice run will allow you to check that your logo is not too wide for your chosen ribbon.

You need to click 'Print', then click 'Properties' and in the 'Media Type' box, there should be an option for 'Tshirt transfers'. Choose that option and your logos will print as mirror images, so they are correct when you iron them on.


If your computer does not give you this option, highlight the image in the first cell, click on Picture Tools, and choose 'Rotate', then 'Flip Horizontal'. As before, copy your image, then paste it into the rest of the table.


When you have printed, your paper will look like this (without being hacked into of course!)


The next part is really easy! Cut your logos out and iron them onto your ribbon, making sure you have read the instructions on the transfer paper package. Make sure your iron is set to a dry cotton setting - no steam!


When you think they are done, give them another iron just to be sure. Let them cool completely. Then carefully peel off the paper backing to reveal your lovely labels.


Cut them up, seal the ends gently with the cigarette lighter, and you are ready to sew them on to your projects.


If you need any extra help, feel free to email me, tweet me, or send me a message on Facebook. I would love to know if you make some! Please share a photo over at my Flickr group!

D.I.Y Thursday - Tutorial show and tell

 D.I.Y THURSDAYS

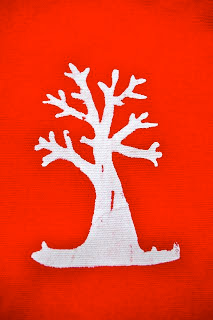
Greetings my D.I.Yers today is thursday yeah!!!! What's so good about thursday will is tutorial show and tell day, where you my D.I.Y family send me a picture of something you D.I.Yed and i post two must try  tutorials . Shout outs to Susan who posted this lovely must try tutorial on Crafterhoursblog.com. On how to do your own Screen Priniting with Mod Podge. For those of you new to the D.I.Y nation, screen printing is fun, creative and easy way to spice up your next dull plain t-shirts. And you can even use this technique on bags, curtains you name it. Be creative and explore the D.I.Y possiblities with D.I.Y screen priniting with Mod Podge. So next time your searching the web, go to crafterhours  at the link below and check out there crazy must try D.I.Y tutorials.Don't forget to send my your D.I.Y pic, questions, comments what ever, lets reason.

Peace and Blessed

Luv


http://www.crafterhoursblog.com/p/our-tutorials.html

Screen Printing with Mod Podge: A Tutorial

I've been thinking about it foreeeever. Screen printing. I've done the real deal before, and I'm not interested in gearing up with all of the real stuff. I've already got supplies all over my house. I might try something like a Gocco printer eventually, or one of the variants like a Yudu, but for now, it was time to try.... the Mod Podge way.

I started by reading
this, and then I changed it up just a little to suit my OCDs. Bear with me.

You'll need:

- an image to print
- paintbrushes, likely one small round for detail and one medium other for big areas
- sheer polyester fabric, the cheap curtain stuff, even 1/4 yard goes a long way
- duct tape
- masking tape
- acrylic paint or fabric paint
- a squeegee
- Mod Podge, I used the Matte version
- a frame, and here you have options. Choose one of the following:
     Option 1) Coroplast (the plastic corrugated stuff yard sale, political and realtor signs are often printed on)
     Option 2) A nearly rigid plastic plate, I tried Vanity Fair Everyday
     Option 3) 2 pieces of scrap chipboard, aka cereal box

Select your image.


Make a frame.  The coroplast option is the quickest and easiest, but the plate and chipboard options use stuff you're more likely to have on-hand.


Make a hole in the coroplast large enough for your image plus some working room and enough material to maintain rigidity, at least an inch on each side. A plate works the same way, just... round.

If you don't have coroplast or an appropriate plastic plate and you're going the scrap chipboard route, place your image on top of two pieces of chipboard. Eyeball it to make a hole in the center of two pieces large enough for your image + a 1" border all the way around. Cut the hole in both pieces. Using two pieces gives you the rigidity you need for a frame. Wrap it smoothly all the way around with duct tape. Both sides. You want the frame to be as waterproof as possible. Essentially you're making a waterproof frame that costs pennies... and is custom-sized for your project.

Trim a piece of screen fabric that's larger than your frame. I'd say at least 1/2" all the way around. 

Place the frame on top of your fabric. Wrap the edges around snugly your frame, taping one side at a time, tightly but not so tight that it warps your fancy custom handmade frame. Tape opposite sides first. 12 o'clock, then 6, then 3, then 9. If you go around in a circle you'll likely have a big wonky corner at the end. Then center and trace your image onto the screen.

Set some magazines or other thin items at the edges of the frame so that you can paint the Mod Podge in the negative space without sticking it to your work surface. I like to add a tiny bit of colored acrylic paint to the Mod Podge to give it some color-- makes it easier to see what you've painted and what areas need touching up before you try printing. While you're painting, flip it from side to side since it'll get drippy as it flows through the holes in the sheer fabric. Paint all the way out to the edges.


Let it dry.

Seal the edges with masking tape. Makes nice clean edges so there's no paint squishing out in a random corner.

Check for any bubbles that might have left holes and touch those up if needed.

Place a piece of cardboard under the piece of test fabric you're printing on. Otherwise you'll likely print through to whatever is behind your top layer. Have a stack of backing scraps and pieces to print on at the ready-- if you like it and you want to keep printing, you don't want your screen to sit long with paint on it.


Place your frame on top of the print surface. The screen should be flat against the surface with no gaps.

Drop paint at the top edge and pull it down with a squeegee.

Pick up the frame and see how it looks! If there are any big gaps you can experiment with setting the screen back down. If it's a little off, it could give you a distressy sort of look.


Let the print dry. Do lots more. DO NOT let your screen dry with paint on it. Unless you're sure you never want to use it again. 'Cause that'll kill it dead.

The MINUTE you're done printing, go directly to the sink and gently rinse your screen, rubbing carefully with a paintbrush or your fingertip where needed. Dry. Press between heavy books if it starts to warp. Reuse forever and ever. Swap prints with friends. Upload photos to our flickr group. We'd love to feature our favorites!


Oh! Here's what the duct tape and plate versions look like:


And this, for me, is a jumping off point. More posts soon to show you what I've been doing with this-- and... a GIVEAWAY! Warning: I've been working on this for a while now with no end in sight. You may get very, very tired of me and the screen print variations. So that's why we're working on a giveaway. A sparkly, shiny, fun distraction from my nerdiness.