Monday, January 7, 2013

HARNEYS XMAS FASHION SHOW- MENEN- I DESIGNS

Greetings DIYers,

Blessed new year to you guys, whats on my agenda for this new year, yep you guessed it DIYing. My 2nd Annual Know Thyself Fashion and Craft show is soon here, something am trying to do every year to celebrate black history. This is where I get to show off my diy habits in a big way, so please keep it locked for dates, venue and time so you and the family can come out and fuljoy.

Ok so what was the last diy thing you did last year to end the year off right? For me I did a mini xmas fashion show for my job. It was lovely and alot of fun, here are some of my diy fashion for you the diy nation brought to you only by meneni-diyers.blogspot.com. Let me know what you think, and if you like what you see and you want to see more be sure to check out my show next month.


                                                           (  Bag only- accessories segment)

Tuesday, November 20, 2012

DIY- Holiday Madness !!!!!!!

Hi Guys

Another tutorial for you guys from our friends at Maganslens. com sharing something that can be done to spice up your living room or any room for the holidays. And you can find burlap fabric in different beautiful colors to brighten up your room. Fuljoy and stay tune for more form d.i.yers.blogspot.com.

  Personal Project | A DIY Lamp Shade

Burlap DIY Lampshade

This is not at all client-based. It doesn’t have anything to do with my photography business. However, I get asked pretty frequently which design blogs I follow. One of my absolute favorites is Tatertots and Jello. My sister-in-law, Leslie, introduced me to this blog and I’m an avid reader ever since. Jen comes up with great themes and ideas, and then finds tons of resources and DIY projects for ways to make those ideas come alive. I love that she posts a wide variety of ideas to cover a large spectrum of interests and tastes.
This Saturday I was browsing T&J in my google reader. I always star my favorite projects that she shares. I found one that just made me absolutely giddy. It was a burlap Anthropologie-inspired do-it-yourself project for a lamp shade. My, heaven. I starred it and kept thinking about it. I had been on the search for an awesome lamp, but hadn’t found one yet. Our little measly lamp needed to be updated. All weekend, I was focused on how I could find a lamp and make this happen.
Fast forward to Sunday. Dustyn and I went to Home Goods after service at the Austin Stone. It’s in South Austin, and again, I’d heard fantastic reviews from Leslie. We browsed around and found a few jars made of beautiful recycled glass for our living room. I saw a lamp that I immediately fell in love with, but just didn’t love the price tag. It was $40 and I was sure I would find something else I liked for cheaper – especially since I was about to do some “work” to it.  What if I messed it up? After we finished browsing, we went to check out our jars. I returned our basket and passed by the lamp again. I spontaneously picked it up and ran to the counter before Dustyn could swipe our debit card. He just smiled at me and said, “I knew you’d get it.”  I hadn’t found anything else at all the stores I’ve seen online or in person that I liked nearly as much.
On our way home we stopped at JoAnn Fabrics so I could purchase glue sticks and burlap.  I started on it right away last night. The whole project took me about three hours, and I even started completely over at one point.  Here’s the before and after.  If you want to do this project on your own, click this link for directions. I offer a few more tips at the bottom in addition to what was posted on T&J so scroll all the way down!
Personal Home Project Anthropologie Inspired Ruffle Lamp Shade1 Personal Project | A DIY Lamp Shade
Anthropologie Inspired Ruffled Burlap Lamp Shade on Green Lamp Base1 Personal Project | A DIY Lamp Shade
Close Up Photographs of Ruffled Burlap Anthropologie DIY Lamp Shade Personal Project | A DIY Lamp ShadeWhatdya think?  Pretty awesome transformation, huh?  I am so excited. It really stands out in the living room, whereas our old one just blended right into the wall.
My tips for this project:
  1. Prepare to get burned.  The directions on T&J suggested that you only do a few inches of hot glue on the burlap at a time to glue it to the lamp shade. I found that it was easier for me to put glue on the entire strip and then shape it. When I only put a few inches down, I got burned so many times because I had to get close to the burlap and if I was filling in a gap, the space was tight. 
  2. Have patience. Try out the design and if you don’t like it, start over. I initially put all the pieces extremely too close together. I ripped them all off and started completely over. I’m glad I did because the final project is a lot closer to what I had hoped for.
  3. Cut and iron out a few pieces of burlap to “test out” at the beginning. I didn’t think there was a scientifically perfect length for each piece to be, so test it out, see how tight you like the bends in the ruffle to be, and then continue cutting and ironing pieces.
  4. Lay a drop cloth down on the floor. Or maybe just towels. I did this on our dark hardwood floors and white burlap was everywhere. Absolutely everywhere. It was messy and dusty.  Go buy a $2 painting drop cloth that you can bundle up and toss in the trash after this is complete!

Thursday, November 15, 2012

HAPPY HOLIDAYS-DIY CURTAINS


HI GUYS, 

I got something for the masses lol' dressing up your house for the holidays are always a tradition in the caribbean. And its my DIY duty to help you out, so check out this cool tutorial from houseofhepworths on how to make your own curtains. A fun and exciting way to spice up your home for the holidays. Be sure to check out the link below for more cool ways to spice up your home. And make sure you stay tune for more from DIYers. Peace and blessed luv. 


http://www.houseofhepworths.com/2011/10/12/how-to-make-professional-lined-curtain-panels/


How to make professional lined curtain panels

This is my 3rd and final post about my awesome Aviary curtains. You can also go back and read about the curtains and learn how to make your own custom curtain rod.
Have you wanted to sew your own curtains, but you have no clue where to start? Does making your own curtains intimidate you? Does the thought of sewing your own lined curtains freak you out?
Before a few weeks ago I answered YES to all three questions. However, now I can say that I’ve made my own lined curtains, and I survived! And now I’m going to show you how to make your own too.
Thomas_Paul_Fabric_curtain_rod_32

I’ve got loads of photos (too many probably!) so hopefully you’ll see just how easy it really is to sew your own curtains.
Here’s the fabric I used:
sew_curtains_thomas_paul_aviary_hepworths_02
To start, spread your fabric out on a large flat surface (the {clean} floor works great), measure it, and cut each panel about 10″ longer than you’d like your curtains.
sew_curtains_thomas_paul_aviary_hepworths_01
Once your fabric is cut, it’s time to iron!
sew_curtains_thomas_paul_aviary_hepworths_04
I ironed the reverse of the fabric just to be safe. I didn’t want my iron freaking out on me or anything and ruining my fabric. That would suck hard core.
sew_curtains_thomas_paul_aviary_hepworths_03
If you don’t like to iron, you might as well give up now. You will do more ironing than sewing!
I ironed the entire curtain panel first, then I ironed both of the length-wise edges (sides). It’s much easier to sew the panels if the seams are completely ironed first.
To iron the edge, fold the raw edge over about 1/2″ and press. Do this down the entire edge of the fabric.
sew_curtains_thomas_paul_aviary_hepworths_05
sew_curtains_thomas_paul_aviary_hepworths_06
Once your edge is ironed, fold it over again and iron a 2nd time. This is your finished edge that you will sew in a few minutes.
sew_curtains_thomas_paul_aviary_hepworths_07
sew_curtains_thomas_paul_aviary_hepworths_08
Once your edge is ironed, you’ll need to iron the opposite edge as well.
sew_curtains_thomas_paul_aviary_hepworths_09
Both edges should now be ironed about 1/2″, then folded over and ironed about a 1/2″ again to create a finished edge.
Now iron the TOP of the curtain fabric about 1/2″ over.
sew_curtains_thomas_paul_aviary_hepworths_10
Instead of folding it over a 2nd time and ironing a 1/2″, this time fold over and iron about 3″. This is creating the finished edge of the top of the curtain.
sew_curtains_thomas_paul_aviary_hepworths_11
You should now have 3 edges ironed over (twice each) and the bottom edge of the fabric left untouched.
sew_curtains_thomas_paul_aviary_hepworths_16
From here, leave your curtain fabric alone. We will now prep the fabric for the lining of the curtain.
I wanted a cheap solution for the lining, but that was also good quality. My solution? Cream colored twin top sheets from Wal-Mart. They are $5 each, and I bought two packages – one for each curtain panel. They are the perfect length, and just a tad too wide. They are a great alternative to curtain lining fabric and come in a wide variety of colors.
sew_curtains_thomas_paul_aviary_hepworths_12
I didn’t pre-wash the curtain fabric or the sheets. If I ever need to wash them, I will hang them to dry to prevent shrinkage.
First step to prepping the sheet (curtain lining), cut the hem off of both long edges of the sheet and the bottom edge.
sew_curtains_thomas_paul_aviary_hepworths_13
Now un-stitch the top edge of the sheet.
sew_curtains_thomas_paul_aviary_hepworths_14
Lucky you… more ironing! Iron the entire top sheet once the top edge is un-stitched and the other 3 edges are cut off.
sew_curtains_thomas_paul_aviary_hepworths_15
Lay your sheet over the top of the reverse side of your curtain fabric making sure the top and left edge are lined up perfectly with the edge of the curtain fabric. (I am a leftie, so my tutorial is made for left-handed people. If you feel comfortable, you may want to line up the right side first. Otherwise, just stick to the left-handed instructions.)
sew_curtains_thomas_paul_aviary_hepworths_17
sew_curtains_thomas_paul_aviary_hepworths_18
Slowly tuck the edge of the sheet under your ironed edge on the curtain fabric. Tuck only the top and left side. Don’t worry about the right side or the fact that the sheet is too wide for your curtain.
sew_curtains_thomas_paul_aviary_hepworths_19
Your top and left edges will now look like this:
sew_curtains_thomas_paul_aviary_hepworths_20
Pretty, hua?! Lookin’ good so far!
Work your way along the top and left-side edges and pin them every 6″ or so. Make sure your pin attaches to the curtain inside the pleat as well.
sew_curtains_thomas_paul_aviary_hepworths_21
sew_curtains_thomas_paul_aviary_hepworths_22
Now {finally!} it’s time to sew! Don’t be intimidated by this step. You are only sewing a straight stitch. No curves or anything!
Sew along the pinned edges, removing your pins as you go. Sew about an 1/8″ from your inner seam on each edge. This will leave an almost 3″ gap when you sew along the top of your curtain but that is okay. You can even use that pocket to stick the curtain rod through if you choose to hang them that way instead of with curtain clips.
sew_curtains_thomas_paul_aviary_hepworths_23
When you have both edges sewn, lay your fabric out on the floor again paying close attention to getting your sheet and fabric both as smooth and flat as possible.
sew_curtains_thomas_paul_aviary_hepworths_24
From here you need to remove the excess sheet fabric along the right side of your panel. Carefully cut it along the curtain edge making sure to not cut your curtain fabric. Also, don’t cut it too narrow. The sheet needs to be long enough to tuck inside your curtain seam.
sew_curtains_thomas_paul_aviary_hepworths_25
Once the sheet is completely cut up the right side, you will do as you did on the other edges – tuck the curtain under the pre-ironed curtain seam, pin it all the way down the edge, and then sew it.
sew_curtains_thomas_paul_aviary_hepworths_26
You are *almost* done now! Yippie! Your curtain is ready for hanging (you will figure out the bottom hem in a minute. I didn’t forget.)
Attach your clips to the top edge of your curtain and hang it. To see how to hang your curtain with faux Pinch Pleats, follow this tutorial.


If you want your curtains to be exactly touching the floor, you’ll probably want to hem them while they are hanging to make sure your measurements are exact.
sew_curtains_thomas_paul_aviary_hepworths_27
First, figure out how much extra fabric you have.
sew_curtains_thomas_paul_aviary_hepworths_28
While sitting on the floor, take your time putting pins in along the fabric bottom (on the front of the fabric is easier) to mark where you want the bottom edge of your curtain to fall.
sew_curtains_thomas_paul_aviary_hepworths_29
Once you have the front of your fabric pinned it’s much easier to pull the fabric away from the wall and properly pin your fabric for hemming. Make sure to tuck the raw edge under so it doesn’t fray and also keeps it looking pretty and professional.
sew_curtains_thomas_paul_aviary_hepworths_30
After you have checked and rechecked your curtain to make sure it’s the perfect length (you may have to tweak it a few times), you can now hem them. I chose to hem them while they were hanging for two reasons: 1) I was lazy and didn’t want to take them down again, and 2) if you hand hem them you don’t see as much stitching across the front.
You can totally just take the curtains back down though and hem them across the edge like you did on your top hem.
sew_curtains_thomas_paul_aviary_hepworths_31
I ended up sewing down the entire edge on the side of the curtain as well because it was kind of gaping open. Here is the finished bottom hem.
sew_curtains_thomas_paul_aviary_hepworths_32
You have officially sewn a completely lined, professional quality curtain panel! Now get busy making the 2nd one. ;)


This completes my 3-part series on my Aviary curtains. I hope you learned a lot in the process. If you end up making curtains, I’d love to hear all about them!

Tuesday, November 13, 2012

DIY-TABLERUNNERS


Hi Guys,


The season is soon here and I know your getting ready to spice up your homes for the holiday for all the family gatherings and so on. Here's a easy simply way to spice up your dining table for you holiday dinners. Check out this tutorial from Sharon Sews. Be sure to check out there blog and keep it lock to this blog and the others by Menen I. As usually leave your comments and keep DIYing, Peace and Blessed Luv.

http://sharonsews.blogspot.com/2011/03/diy-how-to-sew-table-runner-with-one.html


DIY: How to sew a table runner with one yard of fabric

A table runner using one yard of fabric? You betcha. (That's Minnesotan for yes.)

I'll show you how to showcase that one little yard of home dec fabric you just had to have.  Or maybe that's just me? I fall in love with these home dec fabrics but don't always have a clear vision as to how I'll use them.  I lucked out here as the orange and blue and brown in the runner pull together the colors in my family room and kitchen.


You'll also need some flat trim or 2" wide fabric strips.

Oh, and if you want to make the runner reversible you'll need about a half yard of a contrast fabric.

The finished size is about 15-1/2" x 65".

Let's get started.

Supplies needed:
  • One yard 54”wide woven fabric
  • One-half yard contrast fabric – or enough to cut 2 pieces 16”x 17”each
  • Three yards 2”wide trim or fabric
  • Thread
  • Hand sewing needle
Cut:
Main fabric - follow the handy-dandy layout guide I've included. 
  • Cut 1 – 36”x 17”main fabric (A)
  • Cut 6 – 5”x 17” main fabric(B, C, D, E, F, G)
Reverse side:
  • Cut 1 – 36”x 17”main fabric (H)
  • Cut 2 – 16”x 17” contrast fabric (I and J)
Trim or fabric inserts:
  •  Cut 6 pieces of trim or fabric each 2” x 6” long
Main Fabric Layout for Table Runner
Sew the table runner top:

Create the top of the table runner by sewing the trim and fabric pieces together as follows. All
seams are 1/2”.
Fabric sewing order for main fabrics


  • Pin trim to one 17”side of fabric A right sides together. Sew.
  • Pin fabric B to the trim right sides together. Sew.
  • Pin trim to fabric C right sides together. Sew.
  • Pin fabric D to trim right sides together. Sew
  • Pin trim to the other 17” side of fabric A right sides together. Sew.
  • Pin fabric E to trim right sides together. Sew.
  • Pin trim to fabric F right sides together. Sew.
  • Pin fabric G to trim right sides together. Sew.
  • Press all seams towards the fabric. 
Press seams towards the main fabric of the runner
(Look a bit familiar? This is the step where I melted some of the trim - see don't sew while sleepy reason three)


Right side of runner with inserted trim

Sew the table runner back:
  • Pin fabric I to one 17”side of fabric H right sides together. Sew.
  • Pin fabric J to the other 17”side of fabric H right sides together Sew.
Fabric sewing order for reverse side of table runner

Contrast fabric sewn to reverse side of runner
Finish:
  • Pin runner front to runner back right sides together.
  • Sew along all four edges using a ½”seam.
  • Leave about 8"open.
  • Turn right sides out through the 8" opening.
  • Press.
  • Slip stitch opening closed.
Voila! 

Two runners in just a few hours.
Runner number one with one main fabric and beaded trim inserts


Runner number two with contrast fabric ends. 
When I flipped the runner over to photograph the reverse side I left it on that side and walked away. Hubby entered the room and wondered where the runner with the beads was as he "liked that one better".  I casually flipped the runner over while he watched. Hee! Hee!

Bonus tip:

Add piping or another trim along all four edges if you want to eliminate the contrast fabric peeking out at the edges.

Hope you enjoy sewing this runner.
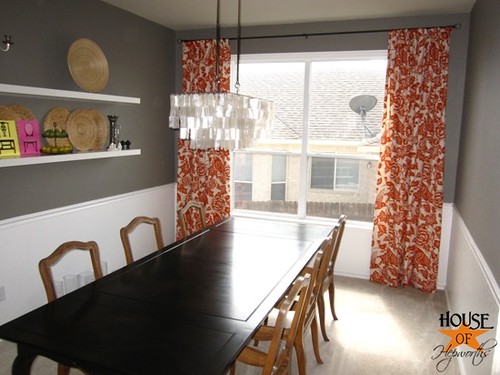
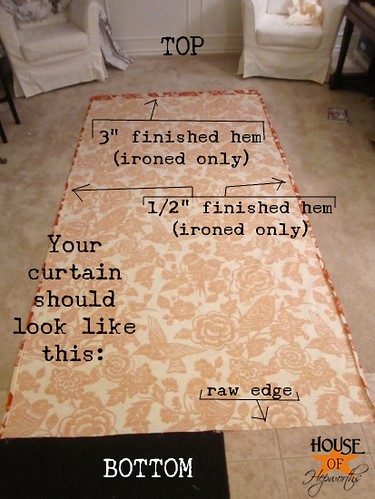